- Get link
- X
- Other Apps
In my Previous blog, I have explained about overview and benefits of using Sitecore Content Serialization using CLI. Please refer it before going into this blog.
The Sitecore Command Line Interface (CLI) serves as a robust utility that simplifies development tasks, automates processes, and boosts productivity in Sitecore projects. It has introduced in Sitecore 10 and subsequent versions. In this technical blog, we’ll guide you through the process of configuring and installing the Sitecore CLI.
Prerequisites
Before diving into the installation process, ensure you have the following prerequisites:
.NET Core:
Install .net core before installing Sitecore CLI from the following path .Net Core (version installed dotnet-sdk-7.0.304-win-x64.exe)

Sitecore Management Services
The Sitecore Management Services is a package that you must download and install in your Sitecore Content Management (CM) instance to support Sitecore Command Line Interface and Sitecore for Visual Studio.
To install Sitecore Management Services in CM:
- Download the Sitecore.ManagementServices package file (Sitecore CLI 5.1.25) from the Sitecore Downloads site.
- On the Sitecore Launchpad, click Control Panel, Install a package. Then follow the Installation Wizard to install the Sitecore.ManagementServices package file.
Sitecore CLI Installation
1. dotnet new tool-manifest
This will create manifest file with name “dotnet-tools.json” in the .config folder of solution root folder.

2. dotnet nuget add source -n Sitecore https://sitecore.myget.org/F/sc-packages/api/v3/index.json
This will add entry in the package source of NuGet package manager.
3. dotnet tool install Sitecore.CLI
This command will install the latest CLI version, incase if you want to install specific version of CLI then use below command. Refer this link for available Sitecore CLI versions, Here you can choose your own version of your choice and update in the below cmd
dotnet tool install -g sitecore.cli --version 5.1.25 --add-source https://sitecore.myget.org/F/sc-packages/api/v3/index.json

5. dotnet sitecore init
This will initialize our new serialization project and creates sitecore.json file, .vscode and .sitecore folders in the source directory.

6. Here is the list of plugins that may be installed by default:
- Serialization: For item serialization.
- Publishing: Handles content publishing.
- Indexing: Manages search indexes.
- Resource Package: Deals with resource packages.
- Database: manages database operations.
7. Use below command incase if add/upgrade of any plugins
dotnet sitecore plugin add -n Sitecore.DevEx.Extensibility.Publishing v.5.1.25
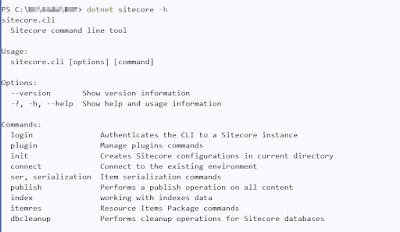
8. To verify that the Sitecore CLI works, go to your project folder in a terminal and type and verify the below response.
dotnet sitecore –h
9. Below is the file structure it creates after running all the commands and you can checkin into your code repository.

Remember that installing Sitecore CLI as a global tool is not recommended, as different Sitecore instances might require different versions of the CLI.
Looking on how other developers can use this tool on their local?
Certainly! The
dotnet tool restore command is used to restore the tools specified in the dotnet-tools.json file. These tools are typically global .NET Core CLI tools that you want to use across different projects.Here’s what happens when you run
dotnet tool restore:1. Tool Manifest Creation:
- If a
dotnet-tools.jsonfile doesn’t exist in your project folder, the command creates one. - This manifest file keeps track of the tools you’ve added to your project.
2. Restoring Tools:
- The command checks the manifest file and restores any missing tools.
- It downloads the specified tools from NuGet and installs them on your system.
3. Global Accessibility:
- Once restored, you can use these tools from the project without needing to install them again.
- For example, if you’ve added the Sitecore CLI as a global tool, running
dotnet sitecorewill work from any project directory.
Remember to ensure that you have the necessary permissions (admin privileges) to install global tools.
Connect with Sitecore Instance
1. To establish a connection with your Sitecore instance run the below command and replace with ID and CM url's.
dotnet sitecore login --authority https://<Sitecore identity server> --cm https://<Sitecore instance> --allow-write true
2. This will open a browser tab with the Sitecore login page and provide your user info. Also ensure you provide grant to application access. Once it success, it will display with the following confirmation message " You have successfully authorized the device" on your browser.

3. Also you will see below screen in the terminal window with confirmation message.

4. Now Sitecore local instance information saves on your local user.json file.
In my next blog, you can check about the Sitecore CLI Configuration files and how to work on CLI.
Comments
Post a Comment
Please do not enter any spam link in the comment box